AP-PROBE
In this post, I will write about how to link by hand different procedures in assembly language directly in DEBUG.EXE. It is not a difficult thing to do, but you have to take good care of details to make things working.
A couple of days later I found again some spare time to conclude the alien planet probe so I set to work and I reopened my file (Fig. A).

|
| Fig. A |
I am not going to show the pictures of all the steps necessary to create the code of the program AP-PROBE and I avoid commenting them since I already did it in the previous posts. By now, you know already how to do this part of the job. When I finished coding and fixing the addresses I set the environment for testing. In Fig. B you see that I chose some special values for the registers in such a way that I could immediately read them back again and see the result.

|
| Fig. B |
As usual, I started testing using the command p. Since all other previous procedures were positively tested, I didn't expect any problem and I didn't want to step into each sub-procedures. I couldn't be far more wrong. In Fig. C and Fig. D you see what happened: DEBUG.EXE crashed and the 16-bit-MS-DOS sub-system was prompting an error window.

|
| Fig. C |

|
| Fig. D |
The window in Fig. D wasn't really helpful and I wondered how the CPU got to CS:IP=0x0000:0077 and how could the code 0x f0 37 05 0c 02 be somehow problematic for the system. I mean that code is rubbish but not harmful1. How could this have crashed the system? So I reset everything for a second trial, but this time I used t instead of p. In Fig. E you see that the call was successful and it started the sub-procedure stack_to_string.

|
| Fig. E |
This procedure and all the others chained with it were carefully tested until
successful pass. But what was wrong then? Can you find where the problem was?
In the end, I found the problem and I fixed it, but I want to leave you some
time to think about it and try to find the problem by yourself (keep in mind
that learning by doing is good and nothing is better than learning by
mistakes).
In the post of the procedure
show_string, I wrote about a feature: the memory location independency of a code. Well,
the point is that even though some instructions in the CPU are implemented in
such a way to facilitate this feature, nevertheless it is not always possible
to achieve truly memory location independency of code. When I was coding and
testing
stack_to_string, I was doing it at a memory location starting at SEG:0120. The reason for it
was that I couldn't know the size of this piece of code so starting from the
top of memory was a good idea. I let it grow downwards indeed. On the bottom
of the 512-byte memory space, I was piling up the procedures that were
finished, tested and working fine. So there is a kind of free space buffer in
between that allows modification of the code on the top, meanwhile, the good
stuff remained safe on the bottom. Every time I finished coding and testing a
new procedure I piled it up on top of the rest of good code. In
Fig. F
you see what I mean by that and what kind of problem rose.

|
| Fig. F |
There are two different ways (techniques) to point memory locations: absolute pointing and relative pointing. The procedure stack_to_string actually implements both of them. The code finds the pre-formatted string using an absolute pointing technique and it finds the two other procedures (out_a_nibble and nibble_to_ASCII) using a relative pointing technique. When I finished stack_to_string and I shifted it down, the absolute pointer didn't move and the relative ones shifted all together down with the code. Once the cause of the failure was found it was easily fixed (Fig. G).

|
| Fig. G |
To test AP-PROBE inside DEBUG.EXE, I had to end the procedure with ADD SP, +1A and RET (see Fig. H) rather than with INT 16 and INT 19 (as in the original program). The reason was that AP-PROBE had to return to the piece of code used to trigger the test with the command p, but before using the RET instruction I had to flush the stack (ADD SP, +1A).

|
| Fig. H |
In the next picture (Fig. I) you see the final test of the AP-PROBE.

|
| Fig. I |
As you can see, it worked correctly inside the test environment however, I had to change the code three more times before sending AP-PROBE to space:
- Inside DEBUG.EXE I have used a trigger (the call instruction at 0x140) to run AP-PROBE all at once with the command p. That has to be removed.
- Overall memory addressing has to be changed to match the condition at boot time CS:IP = 0x0000:7C00.
- AP-PROBE ends with a RET instruction, meanwhile, in the real environment, we have to close the program with the INT 16 (wait for a keypress) and INT 19 (system reboot).
The first point of the list was done with ease with just the command f 140 142 90 which instructed DEBUG.EXE to write the byte 0x90 from memory location SEG:0140 to SEG:0142.
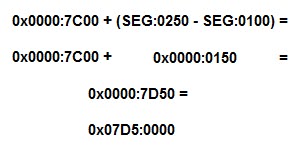
The second point implied correction of memory addresses inside AP-PROBE and stack_to_string. Beginning with AP-PROBE, I considered that the DEBUG address SEG:0100 had to align with the real address 0x0000:7C00 and that the pre-formatted string was at address SEG:0270 in DEBUG. I calculated the real address of the pre-formatted string in the following way:

|
| Fig. J |
Similarly, I converted the address of the closing message string from the SEG:0250 address in DEBUG to the real address:

|
| Fig. K |
You can see the final corrections in the code marked with yellow in Fig. L

|
| Fig. L |
Continuing with stack_to_string, I used the same value calculated in Fig. J and I corrected it, as you can see in the code marked in yellow in Fig. M.

|
| Fig. M |
Talking about the third point in the list of fix to be done, I decided intentionally not to implement the INT 19 (BIOS hot-reboot procedure). You may remember that in the post "Making up my mind", I was writing about my reading that the CPU starts at CS:IP = 0xFFFF:0000 as soon as it is powered on and I was wondering about how to check it. I mean that one can trust what is written in the "INTEL – The 8086 family User's manual", but I want to learn so I always try to challenge and test by myself what I read because this consolidates my learning. So, based on this experimental approach, I decided to test what could have happened if I send CS:IP back to 0xFFFF:0000. The point was that I felt pretty much confident about the success of the AP-PROBE so I inserted this additional test at the end of the code (marked with green in Fig. L)
In the end, I put my AP-PROBE on the top of the GRUB2 Rocket using the following
command from the Ubuntu terminal:
dd if=/home/mik/Desktop/ap-probe.bin of=/dev/sda2 bs=512 count=1
I launched the GRUB2, I saw the alien planet probe landed on the "alien planet" (Fig. N) and I experienced a smooth reboot with JMP FFFF:0000.

|
| Fig. N |
Finaly, I was able to create a working code and to conclude with success my second learing experiments. What about you? Did you make it too? Let me know in the comment.

Comments
Post a Comment