Alien planet probe: the design phase

Just to remain within the metaphor of space exploration, after we showed that it is possible to land on the alien planet, the next natural step for us is to engineer a more advanced module that takes a probe of the planet ground, makes some analysis and sends back the results. The planet is big enough that we cannot probe it all in once so we have to decide which sample to take. An important question for me is: in which status does the CPU is, once the BIOS releases control to the master boot record code loaded in memory? So I will design an alien planet probe that answers this question. However, we have to remember that GRUB2 is a layer between our sample point and the BIOS. The real chain is:
- Power on, CPU points to CS:IP = 0xFFFF:0000 (see INTEL 8086 manual at page 2-29 paragraph “System Reset”);
- BIOS code loads GRUB2 master boot record and releases control;
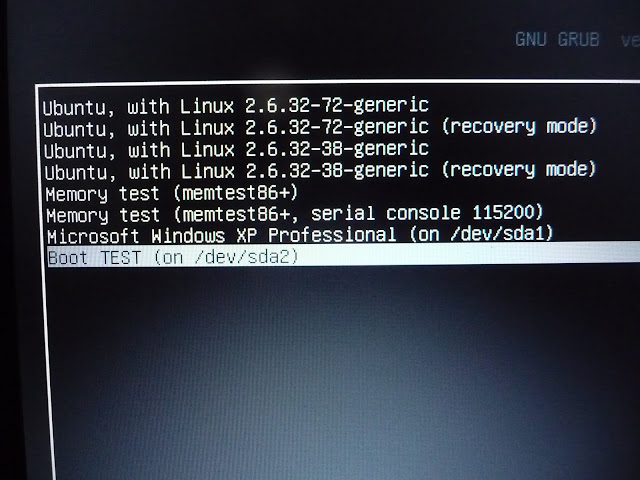
- GRUB2 loads the boot record of the partition "Boot TEST" and release the control.
As a consequence, the result of the analysis with our probe will be the status
in which GRUB2 leaves the CPU once it releases control. Anyway, a successful
design of such a probe will allow us to use the same one on a PC with really
nothing on it, but only this probe in the master boot record. It will work the
same; eventually, values in some registers may be different since we will look
at the status soon after BIOS rather than the status soon after GRUB2.
As usual, I start to make up my mind writing down some code skeleton which has
no instruction at all. Then I will put commands inside this skeleton using the
INTEL syntax, however, this code cannot be translated in machine code by any
assembler since I don't have one. Instead of it, I will use DEBUG.EXE and I
will cast the code by hands. So, similarly to the previous post, what comes
here is the design of the software followed by the real software build-up at
the workshop (inside DEBUG.EXE). For the main procedure, I plan to do some
very easy and simple steps, the last one is the same as the previous
Alien-Planet Landing-Module
so I can write it down immediately.
I have to put the CPU status onto the stack as the very first thing, in such a way that I can use any register later on for operation having their original value saved on the stack. Since every time we put something on the stack, the SP (Stack Pointer) changes, then this must be the very first register to go on the stack if we want to know its original value. There is no direct PUSH instruction for the IP (Instruction Pointer), but every time we use the CALL instruction the CPU saves the IP on the stack to use it as return address with the RET instruction, as a consequence, this is the way to put IP implicitly on the stack. After considering all this the final version for the alien planet probe is the following one.
You may notice that I wrote MOV AX, ????. I do
it just because I don't know the value for
AX when I write the code, but of course, I will
have to put some number here when I will build it up inside DEBUG.EXE.
Despite the complexity of the code is higher now than the previous
Alien-Planet Landing-Module, the main procedure is pretty straightforward because I have split the total
code into different procedures. "stack to string" is still quite complex, so I
split it again in different sub-procedures.
I dedicate a separate post for the design of each procedure.
Comments
Post a Comment