Test and deploy the Space Shuttle

In this post, I write about testing and deploying my bootloader the Space Shuttle.
It was a lot of work right now, but testing such a complex bootloader wasn't
less demanding as well. First of all, the number of tests, that could be
performed inside DEBUG.EXE environment (i.e. on earth before sending it to
orbit), were necessary to gain the required confidence that the first flight
(deployment of the bootloader) wouldn't be a crash, but never the less I had
to prepare a certain amount of test to be performed on the real CPU (i.e. in
orbit and without a parachute). To make it clear: the things that I didn't
test in orbit were the error messages coming from the bad read errors. These
conditions aren't easy to reproduce on the real running environment and real
final software. In this condition either an INT 13H read error really occurs
or it is difficult to provoke it just to test the software1. On the other side, these conditions can be provoked and tested in a much
easier way within DEBUG.EXE, module by module, so these tests were considered
as enougth by me2. In conclusion I wrote my Space Shuttle on the Partition Boot Sector of
the TEST partition and I began the second set of tests.
dd if=/home/mik/Desktop/shuttle.bin of=/dev/sda2 bs=512 count=1
I did some initial test starting with no SOFTWARE.BIG file in the ROOT. Soon after I tested the bootloader using a SOFTWARE.BIG file which was bigger than the limit. To have a file bigger than the limit, I just put a 4 MB PDF-file in the ROOT of my TEST partition and then I renamed it. The screenshots for these tests are in Fig. A and Fig. B.

|
| Fig. A - File not found |

|
| Fig. B - File too large |
In the next stage of testing, I reused all the codes I have created until now. For each test, I placed the code in the ROOT folder and I renamed it in SOFTWARE.BIG. You can see the results in Fig. C, Fig. D, Fig. E, Fig. F and Fig. G.

|
| Fig. C - End of loading phase |

|
| Fig. D - The Space Shuttle loads AP-LAND |

|
| Fig. E - The Space Shuttle loads AP-PROBE |

|
| Fig. F - The Space Shuttle loads check INT 13H |

|
| Fig. G - The Space Shuttle loads LBA-Read |
At that point, the easy part of the testing was done and I was already pretty much happy about how the Space Shuttle was working but some more important tests were necessary before deploying the bootloader (considering that I started really from zero, this was already a great achievement for me). Looking back on Fig. F and Fig. G of post "Design and build the space shuttle", I realized that with those tests I didn't check all the paths of the code. Until now it was just a linear fall thru the code of the bootloader like a ball in the flipper without electricity to operate it. In the next test, I had to check if the flipper bounces the ball upwards and works really as designed. To do these tests, I had to recreate on HDD the necessary conditions. What I did was what a test engineer would call the "design of experiment" i.e. how to prepare the experiment to provoke the desired condition and test the expected behaviour.
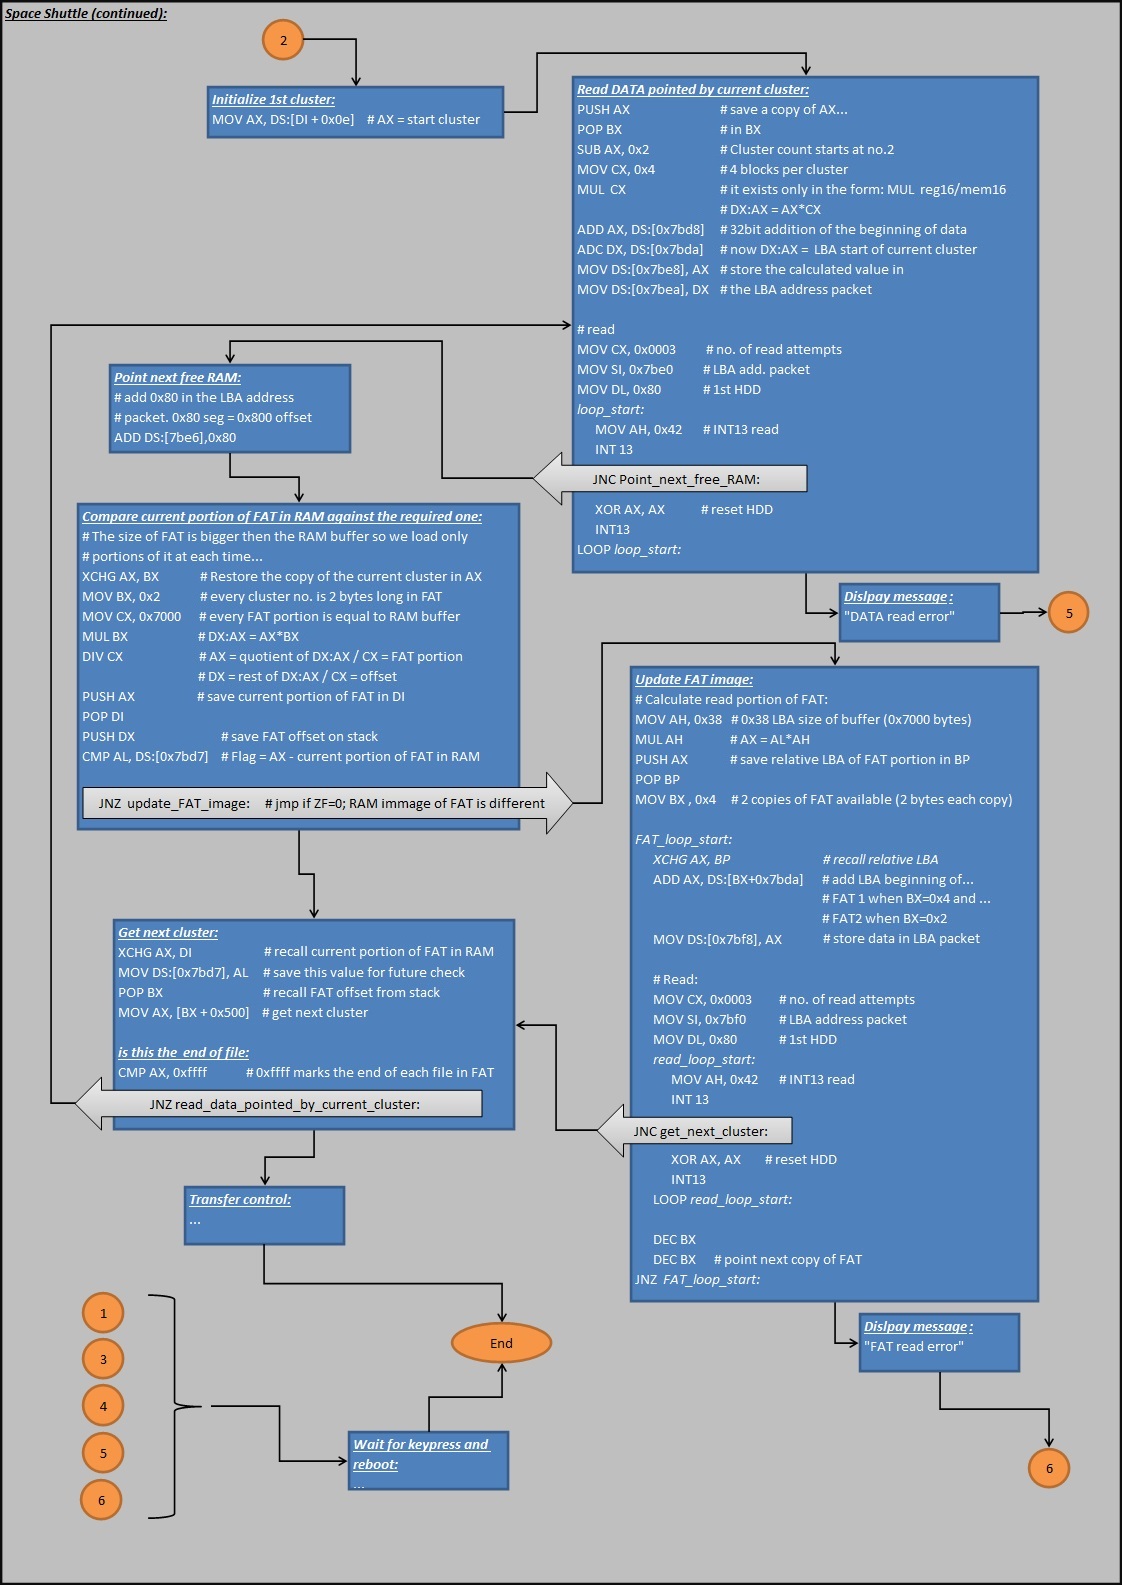
Case 1: read more than one cluster.
Which is the expected behaviour? The Space Shuttle should jump back
from Get next cluster to
Read DATA pointed by current cluster (see
Fig. G
of post
"Design and build the space shuttle").
Which is the desired condition? SOFTWARE.BIG is larger than one cluster.
For this experiment, I wanted to create a SOFTWARE.BIG file which had to be 10
clusters long.
The Space Shuttle had to load and launch it but I didn't want to create something completely new. The file had just to be 20 KB long and I also wanted SOFTWARE.BIG to put something meaningful on-screen. I came out with the idea of reusing AP-PROBE and modifying it to span 20 KB in length. The original code occupies 512 bytes and terminates with a "waiting for key press..." and reboot sequence, so I planned to replace the reboot (INT 19H) with a jump at byte 513 and from there on continuing with a 20KB long sequence of 0x42 (which tells the CPU to increment DX by one). At the end of this sequence, I planned to jump back to the beginning of the code. In this way, I made a looping program which showed the CPU registers on the screen and stoped at every loop. To terminate the program I had to press "ctrl+alt+del" to force the reboot. I created this software in a very easy way using the scripts for DEBUG.EXE as shown here.
The script is very clear. It loads AP-PROBE.BIN and after that substitutes the
INT 19H instruction at address DS:0128 with a
long jump above the 512th byte (commands
a 0128 and
jmp 07E0:0000). The command
f 0300 50FF 42 fills the area with 0x42 (OPCODE
= 0x42, Mnemonics = INC DX). The last command
is a jump back (commands a 50FB and
jmp 07C0:0000). The total size of the file is
set in register CX and the file is saved with the name SOFTWARE.BIG.
In
Fig. H, you see the good result of the test.

|
| Fig. H - The Space Shuttle loads the long version of AP-PROBE |
Case 2: read more than one FAT portion.
Which is the expected behaviour? The Space Shuttle should jump in the
Update FAT image routine (see
Fig. G
of post
"Design and build the space shuttle").
Which is the desired condition? SOFTWARE.BIG is stored across the boundary of
two FAT portions.
Each FAT portion was 28672 Bytes long (0x7000, see size of read buffer in
Fig. B
of post
"Design and build the space shuttle") and there were 14334 clusters inside each portion of FAT (each cluster is 2
Bytes long) so, to place the SOFTWARE.BIG across the boundary of two FAT
portions I had to store a ballast file before SOFTWARE.BIG. Such ballast file
had to be 14329 clusters long (=14334 – 2 reserved clusters – 5 clusters as
half the size of SOFTWARE.BIG) equivalent to 29345792 Bytes (~27,99 MB). I
created a file in excel whose purpose was just to be a ballast on the disk. I
deleted every file from the disk in the TEST partition, then I saved the
ballast file and only at the end I placed the SOFTWARE.BIG file again (see
Fig. I).

|
| Fig. I - Setup with the ballast file |
After that, I booted in Ubuntu and made a dump of the disk to check the real condition of the FAT (Fig. J).

|
| Fig. J - Dump of the partition "TEST" |
Unfortunately, the XP behaved a little bit differently from what I expected. There was a "System volume information" folder saved at cluster 0x0008 as you can see by the long entry in the ROOT (orange colour). After that, I saw the "ballast.xls" starting at cluster 0x0009 (light yellow colour) and finally SOFTWARE.BIG starting at cluster 0x37FF (green colour). Likely I didn't have to repeat the design of the experiment since SOFTWARE.BIG appeared to be across two FAT portions, even if my original plan was to have half of the file in one FAT portion and the other half in the other. The point is that I wasn't aware that XP placed that folder and shifted the beginning for the cluster assignment at 0x0009 for the file "ballast.xls". However, I had the file SOFTWARE.BIG across two portions of FAT and I could perform the test which went good as well (as you can imagine, the screenshot is identical to Fig. H because I was using the same SOFTWARE.BIG).
Conclusion:
The bootloader Space Shuttle was developed, tested and deployed with success and I was very happy with what I did.
Comments
Post a Comment