Alien-planet Landing-module

For the first module I have a single and simple task in mind: just land on the surface of the planet and send a message back on earth just to say that the landing manoeuvre was positively accomplished. Just for this simple task I need preparation and some design consideration. The first thing is to write down the program in a way that it isn't a program rather a text form of a flowchart. Well, it sounds crazy, but that's the way my brain works. Here are the simple steps I plan to do.
This basic idea needs to be adjusted to take into account how the CPU works in order to produce the desired effect. First of all, I want to display two lines so, after the first line, I have to tell the CPU that it has to move one line down (use the special ASCII code 0x0A for a line feed or /Lf for short) and move the cursor back to origin on the left side (use the special ASCII code 0x0D for carriage returns or /Cr for short). Then I decide to put a 0-byte character (/00) at the end of the string as a marker to identify the actual end of the string. I plan to use a "check-and-do-loop" logic to print the characters on the screen. I could have used a "for-loop" logic as well, in which case I used the length of the string so I didn't need to mark the point where it ends. Another thing I have to consider is that I need to point the CPU at the memory location where the string begins. After all these considerations I realized that I have to adapt my software project a little bit in the following way:
Now, I feel that the idea is clear in my mind so I start coding it (AP-LAND
final). I use the INTEL syntax. However, this code cannot be assembled with
any assembler since I don't have one. So this is rather a more detailed
project than a program even if it looks like a code. The only thing I have is
DEBUG and I will use it to do the coding later on. For the moment let me
comment with you the code just to be sure that I am doing the right steps
(remember I am still in the learning phase). First of all, we need to point
the CPU to the beginning of the string so we have to load DS and SI register
correctly. We cannot load DS immediately (i.e. with an immediate value such as
DS=0x0000) since there is no CPU instruction for it, instead we have to use a
workaround: we load AX first and then DS with the value in AX. Then we enter
the "check-and-do-loop" logic to print the characters on the screen.
What we do is to load a byte from the location pointed by DS:[SI] into AL (AL
= DS:[SI]) check it, exit the loop if equal to 0x00 or continue otherwise. To
do that I use the LODSB instruction which is a
tiny tiny piece of software hard-wired in the CPU and corresponds to
MOV AL, DS:[SI] followed by
INC SI. We have to check if the byte in AL is
equal to 0x00 in which case we have to exit the loop. To do that, we subtract
the value of 0x00 to AL and we look at the result. If two numbers are equal
the subtraction result of these numbers is always zero. Anytime the result of
an operation is zero the Zero Flag is set (ZF = 1, or ZR in DEBUG). What the
CPU actually does, is to subtract from AL the value of zero (since this is the
check value) and affects the flags by this operation (CMP AL, 001). After that, we look at the zero flag and we decide to jump depending on
its value (JE). If AL is not equal to 0x00 then
we keep going on and we interpret the byte in AL as a valid ASCII code to put
on the screen by invoking the BIOS function INT 10H. As soon as the character is
on the screen we repeat the loop again and again until we reach the end of
string marked with 0x00. Once the program terminates the display of the
string, it has to wait for a keypress. To do so we use the BIOS function
INT 16H. The CPU waits for a keypress and goes back to our software as soon as
this happens. It returns in AX the key pressed by the user. As soon as INT 16H
returns, the CPU executes a BIOS function INT 19H which reloads the boot sector
in memory. Now it may seem that we are in a loop, but you have to remember
that the real boot sector is the GRUB2 and not our "Alien-Planet landing-module" so the effect of reloading the boot sector leads back to the GRUB2 start
menu (Set up the test rig -
AA) from which we can select what to boot next.
Ok so far so good with design, it is time to put hands on the PC and build the "Alien planet landing module". I start a new session of DEBUG. I check that the memory starting at SEG:01002 is all free (if not so I zeros it out with f 100 2ff 003) and I start coding. At this point, I don't know where my string is going to be so I set SI = 0x0000 keeping in mind that I have to go back here and fix it. Further down in the code I don't know how much ahead I have to jump with JE to get out of the loop, so I just jump to the next instruction keeping in mind that I have to go back here and fix it too. Jump to the next instruction is done pretty easily since at the moment I type I know that I am at memory location 0x10A and those conditional jumps are two bytes long (0x10A + 0x2 = 0x10C). At the end of the loop I have to jump backwards: this is easy since I can immediately read the memory location where I want to jump to (0x107). At the end of the first step, my landing module looks like it in Fig. A.

|
| Fig. A |
Now that I know how big the code is I can start writing the string in memory using the command e (which stands for "edit" in DEBUG). Indeed I could start the string at 0x11B but I prefer to start at 0x130 just because it is easier with my eyes "to see it" inside the hexadecimal dump (Fig. B).

|
| Fig. B |
Now that I know where the string begins I can fix the pointing used for SI. To do that I show the listing of the program with the command u (which stands for "unassembled" in DEBUG) and I correct the line (Fig. C).

|
| Fig. C |
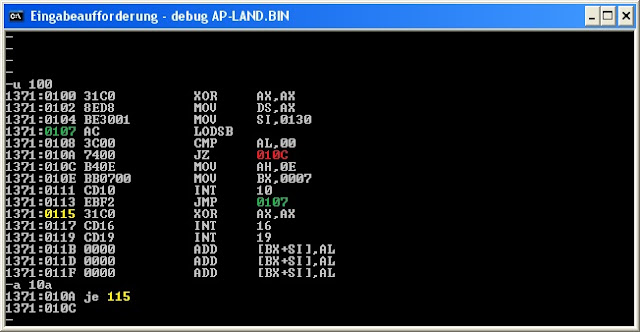
Next, I need to fix the jump at "line" 1371:010a. Note that I typed in JE and DEBUG returns JZ. The point is that the opcode for it is 0x74 and the CPU knows exactly what to do by that (Jump if Zero-Flag is set) but the human interpretation of this is double rising two different mnemonics for the same code: JE = jump in case equal is detected and JZ = jump if operation result is equal to zero. DEBUG cannot know which interpretation of the two I was using for the current code so when it finds the byte 0x74 it translates back all the time using the mnemonics: JZ. Now I know that the loop ends and exits at 0x115 so I fix it too.
|
| Fig. D |
Then I look at it once again in the whole, I check the registry and I think that everything is ok to start testing it (Fig. E).

|
| Fig. E |
For my test, I use the command p (proceed) rather than t (single-step trace) because of the interrupts i.e. as long as debug process any simple instructions p and t are equivalent, but as soon as it processes a CALL or an INT instruction the behaviour changes. The command p executes all in once the function or interrupt called; the command t steps inside the service routine instruction by instruction. After a few steps of execution, I realize that my testing facility is not "the deep-space". Out of metaphor, I have to correct the memory location used in DEBUG to match the one on the real loaded position in memory later on. So the instruction "DS = AX = 0x0000" that I use, is correct once the code is in memory, but needs to be adjusted as long as the code is running within DEBUG. To do it, I reset back the DS registry (Fig. F).

|
| Fig. F |
Now I can keep on testing my code, but before I want you to notice how DEBUG prompts us what is happening during each test step. It shows the values of all registry in the CPU and the next instruction pointed by CS:IP that is going to be executed. Once you press p, you have to look at the line immediatelly following the command to look at the effect of the command (I have used different colours to highlight it with Microsoft-Paint). Keeping on testing, I see that everything seems to run smoothly. I want you to observe that the use of command p produces the effect of executing the interrupt service routine all at once so you see immediately the letter "M" (maked orange in Fig. G).

|
| Fig. G |
Another thing I want you to observe is the impact of the command LODSB that changes the value in AL and SI.

|
| Fig. H |
Now I know that it is working inside the loop, so I can modify the SI pointer to go immediately at the end of the string to check if it gets out of the loop in the right way. To do this I use the command d to identify the end of the string in memory and I use the command r to set it into the register SI (Fig. I).

|
| Fig. I |
As I restart testing I notice that CMP AL, 00 is affecting the zero flag changing from NZ (which means not zero so Zero-Flag = 0) to ZR (which means zero so Zero-Flag = 1) since AL is 0x00. Soon after I see that the JZ/JE instruction works since the flag is set and IP = 0x0115 gets its new value (Fig. J). So the code exits the loop successfully.

|
| Fig. J |
At this point, I have to stop testing since I cannot test INT 16 and INT 19 here and I have to "believe" or "trust" myself that I didn't any mistake there and see the effects on space whether or not the module will successfully land on the alien planet surface. So it is now time to take the code away from the test center and prepare it for the space mission. First of all, I have to put the "boot signature" (Fig. K).

|
| Fig. K |
Then I have to correct SI by the fact that the code will run on the alien planet starting at 0x7c00 rather the 0x100 (Fig. L).

|
| Fig. L |
As a final step, I tell DEBUG which name to assign to the file and where to save it by using the command n, then I set CX = 200 (= 512 bytes in decimal) to set the size of the file that I want to write to disk and I use the command w, but then.... something is wrong! It writes down to disk almost 70 KBytes but why? After a quick check, I realized that BX was "dirty" keeping the value of the last instruction that was affecting it (MOV BX, 0007) so the command "write" was executing correctly writing down BX:CX bytes to disk. I correct quickly the value of BX and I use w again (there is no need to use n again unless you want to change the file name now) this time successfully as you can see in Fig. M.

|
| Fig. M |
Ok, the module is ready, I just have to put it in the cargo bay of the space rocket (out of metaphor "cargo bay" = boot record of test partition and "space rocket" = GRUB2), so I use the Linux dd command for it (Fig. N).

|
| Fig. N |
Now I reboot my PC, I select the “Boot TEST” partition as in Set up the test rig - Fig. AA and....

|
| Fig. O |
IT WORKED! HEY! I MADE IT! WOW....
It is a small step (almost ridiculous) in computer science but a huge step for
me!
Did you made it too? let me know in the comment.
Comments
Post a Comment